I recently moved to a new house, which is great in many ways, but unfortunately, the floor is tile, which is much more uneven than the laminate that I used to have. This means that the Romi robot occasionally gets stuck over a crack or uneven tile due to the size and design of the chassis (4 points of contact mean that it is possible that one of the drive wheels is no longer in contact, and hence the bot can’t move).
Since the last post, I upgraded the Lidar shelf to a fully 3D printed part and upgraded to a Raspberry Pi 4, though I never really took advantage of the power it had. For now, I am going to cannibalize the Raspberry Pi, Camera, and Lidar, though I may upgrade GeMaB later and bring these parts back to the Romi for some parallel development or other fun use.
GeMaB Architecture
I’ve done more development on what I want the overall Architecture for GeMaB to look like. For now, the main brain will be an Atomic Pi. In the future, I may replace this, but since I plan on adding an ethernet switch and modular power, I could simply augment it with something like a Jetson. I’m planning on using a Ryobi 18v battery to power it for now with a Teensy as the motor controller.
I’ve always been interested in Robotics. From playing with motors and popsicle sticks to the first LEGO Mindstorms, underwater ROVs, and FRC, it’s always been an interest. I haven’t had the chance (outside of internships) to get paid to work on them, so I’m starting this project as a hobby to build my skills up in the hardware and software field for current, state-of-the-art robotics topics.
The goal of the project is to create a robot that I can ask to get me a beer, and it will be able to go and retrieve one for me. There are many ways to accomplish this, from a simple arm on a bench that reaches over to an open fridge, to a set of beer-pouring robot arms, to a mobile beer fridge. My goal is to create something that is capable of accomplishing this task while having the flexibility to do other household tasks. The goal is also to incorporate a number of technologies that give me an opportunity to learn the full overview of technologies that allow mobile robots to perform autonomous tasks, not just the minimum to accomplish the state goal.
To that end, my plan is to create a small, inexpensive learning robot to provide a foundation for initial real-world software development, while designing the larger goal robot. A smaller platform will allow me to iterate more quickly and easily, and is less expensive to screw up.
RomiBot
The Smaller Platform
I am using the Pololu Romi base as my small learning platform. It is relatively inexpensive (especially when on sale…), and takes care of a number of start-up hurdles like power, motor control, and processing connectivity. It is also flexible enough that I can strap on sensors and develop algorithms for many of the needed skills.
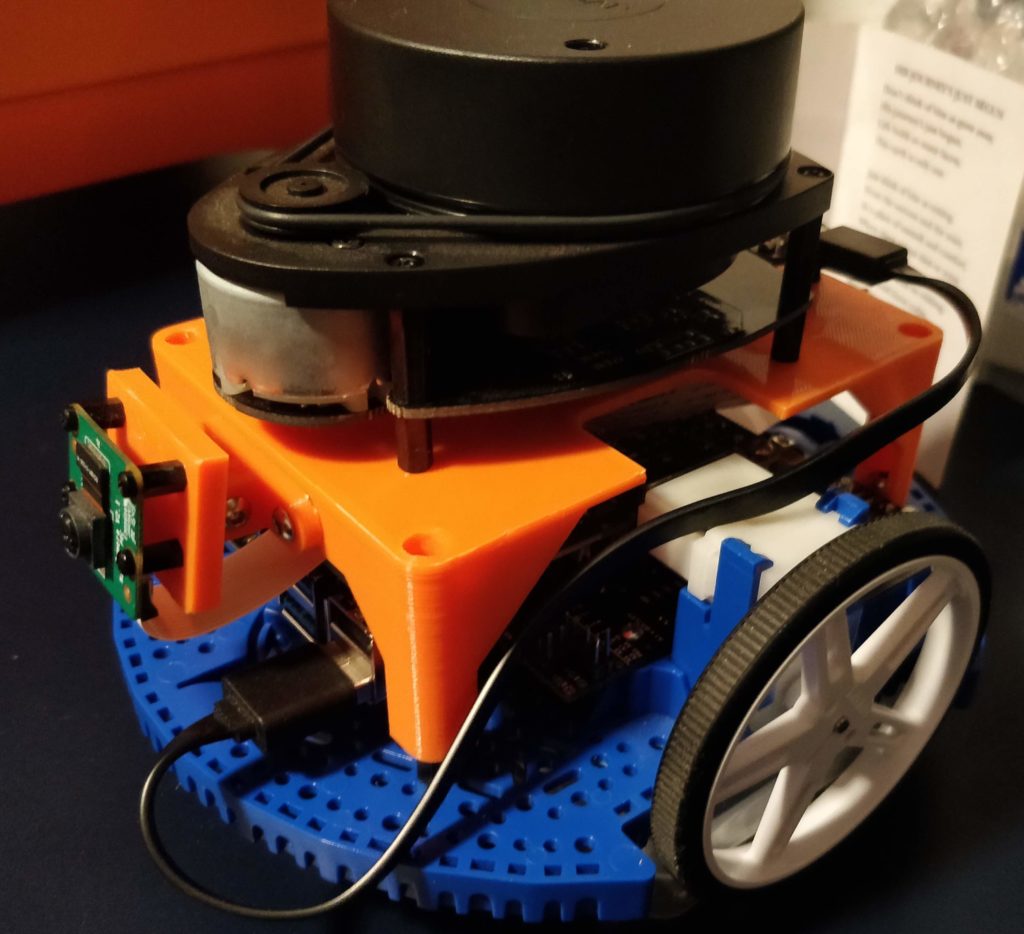
It currently consists of the Romi Base, a Raspberry Pi 3, an RPLIDAR A1 and a Raspberry Pi Camera. I’ve expanded the hardware using a combination of micro-rax, 3D printed components, and plastic sheets. Power is provided through 6 Eneloop NiMH AA batteries. It’s not perfect, but it allows me to have a replacement set on hand, and rechargeable. I can get 1-2 hours of runtime with LiDAR and driving around out of them.
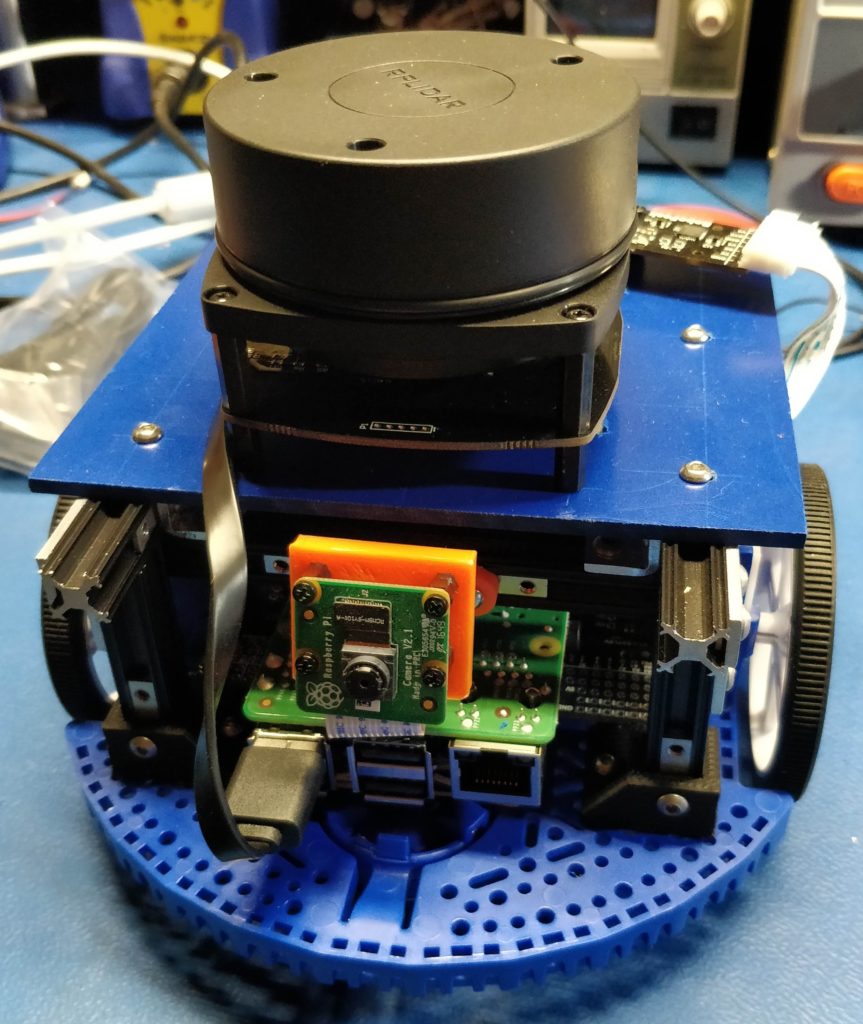
Front View
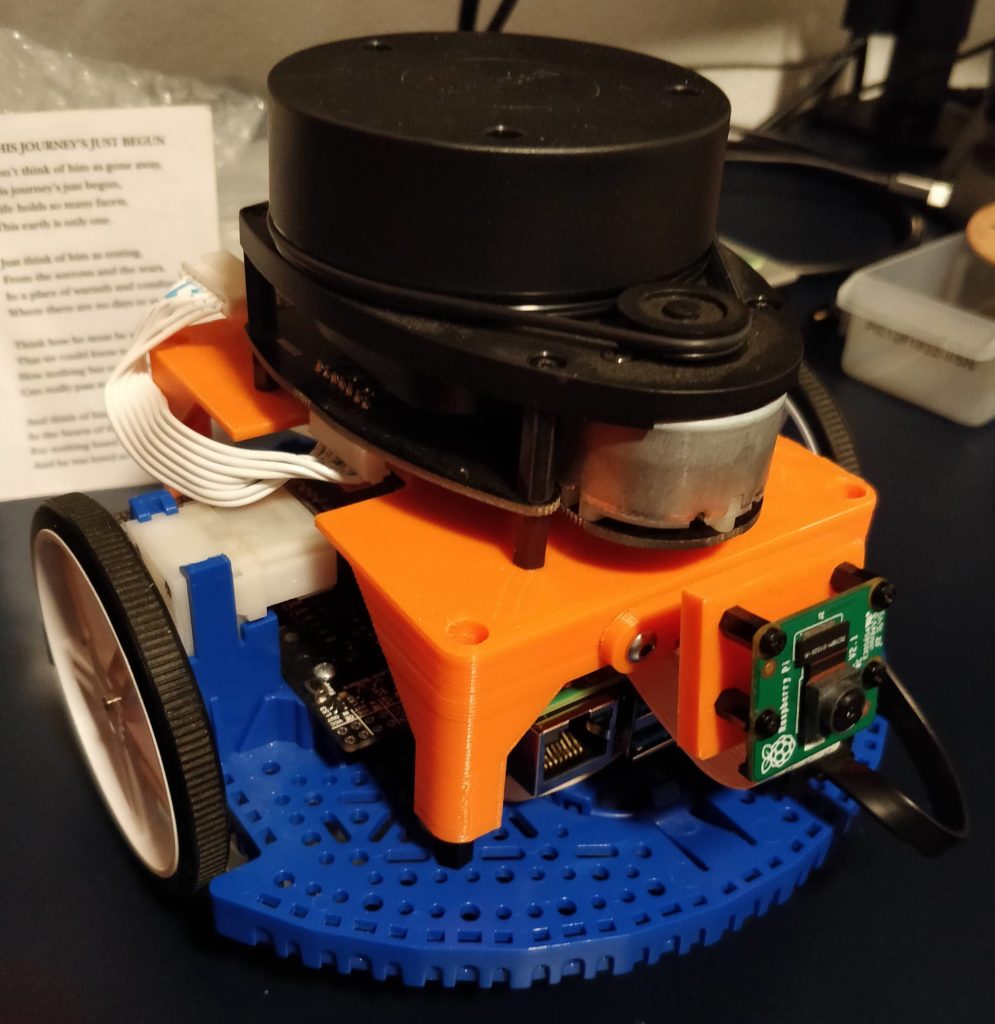
Rear View
The Raspberry Pi is running Ubuntu with ROS Kinetic as the underlying framework. The Arduino on the Romi control board is running the mostly default AStar code, with ros_arduino_bridge (updated to include i2c support). The general framework is intended to be compatible with the turtlebot3 code as much as possible to reduce initial setup effort. It currently can run the turtlebot3 slam gmapping code as well as the camera view code. I have not created a custom URDF or tweaked the gmapping settings to work cleanly, but everything runs. You can also connect to it from remote Android apps to view the camera and control it.
I’ll follow this post up with more details on my higher level plan as well as the on-device setup procedure to get things working in software-land, the 3d files, hardware configuration, and some more.
Hopefully, I’ll update at least once a week with progress, ruminations, or designs.
I want to list out all of the things I am doing on my computer to get it up and running.
Updates
First, after install I ran a system update:
sudo apt-get update
then:
sudo apt-get upgrade
This brought the system mostly up to date. Â I tend to default to the explicit command line update for Ubuntu due to habit, but I imagine the update application is just fine as well. Â I tend to run these two commands before starting for the day on any Ubuntu box of my own that I use in order to keep the system up to date.
Synergy
I have this computer setup next to my main desktop and I don’t want to have 2 sets of keyboards/mice. Â Back in college I used an application called Synergy to connect between my desktop and laptop but haven’t used it in a while. Â I downloaded the Windows 64 bit version (Since I am running Windows 7 Ultimate 64-bit) and installed it. Â I ran it, went into the Server Configuration utility (The Configure Server… button), dragged a screen into the box to the left of my main computer (Starbuck), double clicked it, and named it EmbedDev(since that is the name of the computer). Â I hit Ok twice to get back to the main screen, then opened Settings under the Edit menu. Â I checked ‘Start Synergy after logging in’ and ‘Automatically start server/client’ so it would automatically start when I turn on the computer since I’m lazy and like things to be automatic.
Next I downloaded the 32 bit Ubuntu/Debian version from the site and installed it using the package manager. Â It threw some warnings about not trusting it since it didn’t give a final install size, but I went on and installed it anyways. Â I opened it for the first time, clicked Client, and put in the Windows computer’s IP address (It shows the current computer’s IP address, so I just entered what was showing on my Windows desktop(192.168.1.106 in this case)), and clicked start. It ended up working pretty easily like I remember. Â The next step was to set it to automatically start on that computer too. Â I went to the Dash Home and opened ‘Startup Applications’. Â I hit Add, filled in ‘Synergy’ for Name, ‘synergyc 192.168.1.106’ for Command, hit Save, then Close. Â I restarted since I had to for updates anyways, and sure enough I could pop my mouse over to it after it finished booting (It automatically logs me in since it’s just a desktop in my room.). Â One keyboard/mouse(Logitech’s mk710) for two computers, win.
Every time I get a new development platform or microcontroller to play with I end up spending hours scouring the internet to find the appropriate tools, installation methods, and examples for getting started with it. Â Not only that, but since I end up using a number of desktops and laptops I have a hard time keeping things synched up and clean. Â With these two thoughts in mind I am going to start a post series on building a custom development computer, setting up build environments, and some basic tutorials for several popular development platforms. Â I may do some screencasts in the future if people want them.
Computer Specifications
I want to be complete in this so I’m going to start with my computer build process and Ubuntu install.  Since all this is really for is writing code to run on embedded platforms and possibly some GUI programs for USB/Network device connectivity there is no need for the latest and greatest.  I would like the computer to be compact, relatively low power, and cheap.  I have several hard drives laying around and an extra 19″ Monitor, keyboard, and mouse.  This leaves a case, Power Supply Unit(PSU), motherboard(MoBo), processor, and RAM.  In the vein of simple I went with this Foxconn barebones case/PSU/MoBo, 4GB of DDR3,  and a Celeron G540.  All told it was $194 shipped with tax to San Diego.  Most hardcore computer nerds would turn their nose up at the Celeron series, but this is basically a slower, non-hyperthreading 2 core Sandybridge chip with decent integrated graphics which means it can handle coding and compiling for embedded processors and more for $50, not bad at all.  Check out AnandTech’s budget guides for 2011 and 2012for benchmarks and more information.  I had a 1TB Western Digital Green that I am using for the computer.  I may upgrade to a 60/64GB Solid State Drive(SSD) in the future, but I’m being cheap for now and sticking with what I have in hand.
Build
Those familiar with building computers can skip over this section, but some of you may have never built one before and it is useful to have at least a basic guide. Â I’m not going to go into anything too in depth, but enough to also be a bit of a case review for the Foxconn RM3-H2. In the photo is the hard drive, processor, RAM, and barebones case, nothing much to say here. Here is a view of the inside of the case, everything is already wired up, just awaiting the processor and drives. Â The Quick Installation Guide is actually quite good as it contains pictures for each step for everything so I’m not going to go too in depth. In order to access the internal hard drive mounting location the front panel must be removed. (It’s slightly annoying, but not actually particularly difficult.) Slide out the external drive mounts, and the hard drive mounting location is underneath. The hard drive slides in and attaches with 3 screws. Â If I switched to an SSD this mounting scheme might be a bit of a problem, but I could probably just use the external 3.5″ drive location since it has more mounting options. Â I kind of like the simplicity of it.
The CPU goes in like normal( the guide covers it fully, I wasn’t that thorough with my pictures…), same with the stock heatsink/fan combo.  This is a pretty low power system so I saw no reason to get something after-market.
One thing to note is that the stock heatsink/fan has the wires wrapped around tightly so it is a good idea to loosen them to make sure the fan can turn. Finally, here’s everything installed. Â I left the extra SATA cable in there since it doesn’t significantly block airflow and I won’t loose it…
I will cover the BIOS configuration and Ubuntu install in a future post.
Why not start a series of blog posts on my ludacris custom beer pong table with some electronics. You know, cause beer and circuits mix really well. I will leave the project description to the next post and keep this one to a slight bit of background and a pretty picture.Â
I have been working on a prototype circuit for driving 16 RGB LEDs for a while and felt comfortable enough with my design to put together a PCB. I just got it in from Seeed Studio and want to share my excitement.
I am still working on a full write-up on this, but here are some teaser shots from the kegerator.  The AC unit in the picture is a 10,000 btu unit, but I will be using a 5,000 btu unit in the final build.  Those are your standard 5 gallon corny kegs.  It will also fit carboys for lagering purposes.  I plan on expanding it to have separate areas for tighter temperature control for fermentation.  The ducting is for running the beer lines up to the faucets, I am using a duct to direct some cold air up to keep the lines cool.
For the third brew we are going with Home Brew Mart’s Amber Ale.  It will also mark our first attempt at kegging, hence a simple recipe. This is also our first outside brew with the new burner (Purchased here) and a different location (Beta house). This is going to result in coming up with a slightly different process from before, but since most kegged brews will be brewed at this location, it will be good to have a fresh process.  The cleaning process went well, everything bleached and rinsed, then sanitized with Io-Star. As engineers we both research about beer in our free time and there are some indications that the bleach will eat away at equipment.  It is already visible on the racking tube and its only a matter of time before it is visible on other items.  We are going to start looking for alternative cleaners that are less caustic.
Recipe from Home Brew Mart: Amber Ale
8# pale malt extract
1# 60L Crystal
½# Carapils
1 oz. Challenger (7.9%) 60 min
1 oz. Challenter 5 min
Ferment with W.L. California Ale Yeast
Since nothing ever goes according to plan our recipe is different from the published one.  To start with, we are using Caraform instead of Carapils since HBM was out of Carapils and Caraform would have a similar effect.  We also learned that you need to grind the grains at the store (or at home if you have your own grinder) to crack them and expose their inner goodness.  We didn’t do this last time but will in the future.  They were also out of Challanger hops so we had to select an alternative.  I decided to try to pick his own alternative and compared the properties of Challanger(~7%, mild to moderate and spicy) and made an executive decision to use Santium (5.6%, noble characteristics) instead since I am the super-smart uber brewer and decision maker (Footnote: This is totally not true, I am a total n00b and kind of screwed up a bit on this one, we’ll see how bad later…)
Our recipe:
8# pale malt extract (liquid)
1# 60L Crystal
½# Caraform
1 oz Santium 5.6% 60 min
1 oz Santium 5 min
Ferment with W.L. California Ale Yeast
Again we are following the basic HBM process.  I ‘expertly’ (read: eyeballed) 3 gallons of water into the pot which was outside on our brand new burner.  We put the steeping grains in our grain bag and let it sit soaking in the water as we brought it up to temperature.  Since we were feeling particularly lazy we found a way to hold the bag off the bottom of the pot so we didn’t have to constantly attend it.  In the future we plan on using binder clips to accomplish this.  We monitored the water temperature with the thermometer that came with the burner until it hit about 170.  We then pulled out the grain bag and let the wort come up to a boil.  Once it started boiling we turned off the burner and added our malt extract syrup stirring until it was all dissolved.  We turned the burner back on and brought it back to a boil.  We also got a muslin sock for our hops so we used that this time so we wouldn’t clog up our strainer as much.  We measured out 1 oz and put it in once we saw the beginnings of a boil.  We waited 55 minutes (Full disclosure: this time was taken to finish our beers and eat dinner) then added the other 1 oz of hops to the hop bag for the last 5 min of the boil.  Once 60 min hit we turned off the heat, covered the pot and brought it in to sit in the sink with ice and running cool water to help to cool down the beer.  Once the cooling wort stopped steaming through the slight gap we left in the lid, we knew we were good to add it to the fermenter.  We added 1.5 gallons of water to the carboy then strained/funneled the wort into the carboy.  (Sidenote: it required much less cleaning of the filter screen than last time due to the hop bag.  There were still enough particulates to require a filter cleaning twice in the process but twice for 5 min total was way better than 4-6 times of 5 min apiece.)  We filled the carboy up to just above the 5 gallon mark (we got a little over-zealous on the water pouring), covered the mouth with foil, shook it up, and set it outside to continue cooling down.  We decided that once the colors on the brew temp strip were changing, indicating a temperature in the upper 70s we would pull out a sample for measurements and then pitch the yeast.  We did as such and got the following:
Initial Gravity – 1.066
8.7%
16.5 deg plato
Once the yeast was pitched and the beer aerated it was transferred to a small trashcan for ease of movement and in case we got spillover. Â Since we had a spillover on the last batch we decided to use a blow-off system this time for the first couple days. Â We put the racking cane in the rubber stop and the racking tube on the other end. Â The tube goes down to a small bucket half full of water. Â This should allow for any spillover to be fully contained and not so messy. Â I will be checking up on the fermentation and documenting it as best I can with work and everything.
The first day of fermentation, there was so much activity it bubbled over. Â This was cleaned up and the airlock was replaced. Â In the future we will allow for blowoff during the first couple days. Â We did not do as well of a job rinsing out the bottles after use, so we had to spend time cleaning the bottles but it was helped by the pressurized bottle washer that was purchased off of Northern Brewer. Sterilization went much quicker this time once we got the flow down. We rinsed out any mold, did a bleach soak and rinse then an Idophor wash. Â We used â…” cup sugar with a pint of water this time for priming. Â The strong initial smell from the bottling bucket was fruity. Â Specific Gravity measured to be 1.024 which translates to 6 deg plato and 3.2% ABV, all temperature compensated at 69 degrees. This comes to an estimation of a 7.3% ABV beer which is decently strong.
Observation Notes from tasting glasses: Orange/Red color, Clear, some particulates.  Tasting Notes: Fruity, Citrus, a bit of sweetness, taste a bit of the alcohol, stronger than before. (Not a red ale).  Tasting plan:  taste at specific time intervals.  We waited a bit after syphoning into the bottling container to hopefully let some of the particulate matter settle, we’ll see if it works.  Bottling went smoothly, we filled a number of larger bottles since tastings have been occurring in groups and opening less bottles would be nice.  One note from the process, when filling the hose and bottling wand with beer, the air bubbled out through the 5 gallon container, aerating the beer.  We should probably try to avoid this in the future, even if it wastes some beer.
For our second brew we decided to try an Irish Red.  Even though the decision was independent of the upcoming holiday, I think we subconsciously did it in honor of St. Patrick’s Day.  (Although, it would have been smart to have started several weeks earlier so we would be cracking the first bottle on the proper holiday).  Since we were a bit last minute in planning we decided to stick with Home Brew Mart for ingredients, so we used their recipe too. (Side note: using the pound(#) sign to indicate pounds is ingenious, much better than lbs.)
Recipe from Home Brew Mart: Red Ale
6# pale malt extract
2#amber malt extract
1# 80L Crystal
1/2 # 120L crystal
1 1/2 oz Cenntenial (9.8%) 60 min
1 oz Cascade (6.2%) 1 min
Ferment with W.L. English Ale Yeast
After talking with the guys down there we ended up going with a slightly modified recipe. Â They suggested using primarily the malt syrup with less of the Amber extract. Â They were also out of Cascade hops so they suggested using Amarillo instead. Â Finally, I suck at weighing proper amounts of grain so instead of re-measuring correctly, we just added it all, we shall see what the effects will be. Â We are also using the normal dry ale yeast, not the White Labs yeast, I think it may have been that I only realised that W.L. meant White Labs as I am writing this…
Modified Red Ale Recipe:
8# Briess Liquid Malt Syrup
1# Muntons Amber Dried Malt Extract
420 grams Crystal Malt 80L
310 grams Crystal Malt 120L
1.5 oz Cenntenial 9.0% AAU
1 oz Amarillo 9.1% Â AAU
Dry Ale Yest – Safale S-04
We followed the Home Brew Mart malt extract and steeping grain guides for our process.
We put the 730g of grains in a steeping bag and steeped in 3 gallons of water until it came up to 170 F.  We then added the liquid malt extract, then the dried malt extract, and finally the Centennial Hops.  Upon completing this step, we realized that we were suppose to have added these ingredients after the wort had come to a boil.  While we don’t believe that it will ruin anything, we shall see.  We are going to keep our timer at 60 minutes, we are noting that the wort started to boil at 26 minutes.  We’re not quite sure what the effect of the decreased time at boiling will be, but our thoughts are that it will probably only affect the bitterness of the beer.  Since it took so long to get up t a full boil, we are adding 10 minutes to the boil, so 70 minutes total.  We put the Amarillo hops in for 1 minute then turned off the burner.  We then transferred the pot to the sink where we ran water for a couple minutes the added 3 trays of ice cubes to the sink.  After several minutes we plugged the sink and filled it with enough water for the pot to be buoyant.  While we should probably use a Hop bag in the future, but we are planning on straining it when pouring it into the Carboy.  I should add that we are enjoying a Stone Smoked Porter from a growler fill while brewing. As well as our own west coast pale ale homebrew. Tasking the hop sediment, a Hop bag is sooo happening next time.  After pouring the wort into the carboy, we pulled out some to take measurements.  After letting it cool to 70F we measured a (temperature compensated of course) 1.080 Initial Gravity which equates to 20 plato and 10.5% on the ABV scale (pre-fermentation)
We tasted the wort that we pulled out to measure. Â It tasted sweet with pronounced hop flavor. Â We expect that the yeast will bring the sweetness level down and hopefully round out the flavor, but only time will tell. Â Now we wait…and drink a homebrew 🙂
We bottled our first beer, I was kind of sick so it basically sucked for me, but it went well. Â It took forever since we had to clean all of the bottles, de-molding some of them but we ended up with 42.5 bottles of beer, not bad for a first shot at it. Â We will try to remember to wash the bottles ahead of time in the future.
We used 3/4 cup of sugar with a pint of water for carbonating in bottle, we kind of forgot to pour the mixture into the bottling bucket first so we had to add it after syphoning and mix it in. Â We seemed to be quite successful with syphoning, there was next to no sediment pulled from the carboy.
I know this is a short and super not informative post, but I forgot to write it at the time and am going from memory. Â Future bottling posts will be better.